Blog Archive

Showing posts with label Baking. Show all posts

Saturday, October 31, 2009

French Macarons

The 2009 October Daring Bakers’ challenge was brought to us by Ami S. She chose macarons from Claudia Fleming’s The Last Course: The Desserts of Gramercy Tavern as the challenge recipe.

Dating back to the 18th century, the macaron is a traditional French pastry, made of egg whites, almond powder, icing sugar and sugar. In the 1830s macarons were served two-by-two with the addition of jams, liqueurs, and spices. The double-decker macaron filled with cream that is popular today was invented by the French pâtisserie Ladurée.

I have only once had french macarons in my life. My friend Janice brought a bunch to my house-warming party a few months ago and we had fun trying to figure out the different flavors. The lavender was strange. The hazelnut with chocolate filling was my favorite. I decided on a Fall flavoring... something nutmeggy, cinamony, pumpkiny... These pumpkin-safron macarons looked fabulous... But then I forgot to put the saffron in... and the safron was replaced by turmeric... and the pumpkin-cream cheese filling was replaced by pumpkin buttercream... So the end result was completely different. Oh well.

As you can probably tell from the picture, my macarons didn't quite turn out. They didn't rise and didn't form that nice foot and that slightly crunchy crust good macarons have. They just kind-a baked and sprawled a bit. I think my egg whites were too small and the batter ended up too dense. But they still ended up being nicely chewy and the pumpkin buttercream was fantastic so everyone loved them and most of them promptly disappeared at the pre-U2 dinner last weekend. I would love to make them again, with bigger eggs and probably a different recipe.

French Macarons

2 1/4 C Icing sugar
2 C almond flour
2 Tbs granulated sugar
5 egg whites at room temperature
+ 1 tsp turmeric for color

Sift icing sugar and almond flour together. Beat egg whites to soft peaks. Slowly add granulated sugar and keep beating till hard peaks. Sift sugar/almond flower mixture in 2-3 parts and fold gently with the egg whites. Line baking sheet with wax paper. Pipe into 1-inch mounds 1-inch apart. Bake for 5 minutes at 200 F then turn the oven up to 375F and bake for another 8 minutes. Let them cool in the pan before removing.

Pumpkin Buttercream

1/2 C butter (1 stick)
1/2 C pumpkin puree
1 tsp cinnamon
1/2 tsp allspice
1/2 tsp ginger
1/2 C confectioner’s sugar (more or less)

Mix. Beat. Eat.

Read more ...

Sunday, October 18, 2009

Treats to Share with Mr. Dog


I am sure you have noticed it - the showing of pictures, the discussion of minor habits, the constant retelling for funny (and not so funny) stories and of course, the inevitable attribution of human moods, feelings and intentions. Yes, people with pets have this specific kind of obnoxiousness and I am certainly very much guilty too. Now that I have admitted that I can indulge in a whole post dedicated to my dog, complete with pictures and all.

Atlez, my dog, turned 4 years old this past week and like any self-respecting dog parent (yes, parent, not owner) I organized a week-long celebration, complete with cake (carrot cake from Three Dog Bakery), two visits to the dog park, fancy food, manicure, and today  - a hike with a friend's dog and home-made dog biscuits for a snack. I am sure the whole shabang did not register with him in the least  and that all my care was wiped clean from his memory by the bath I just gave him, but it was nice to do it all the same. 

I have been meaning to make some treats for him for the longest time, ever since I actually ate one of the dog treats I bought for him and found out why he refused the eat them. They taste like cardboard, that's why. To the best of my knowledge he doesn't like to eat cardboard. He likes cheese, and lamb, and beef, and chicken, but above all cheese. Meeee toooo. So I made him biscuit that we can share. They are technically dog biscuits but nothing in them is dog-specific and I have been nibbling on them as much as he has. They are tasty. We both think so. 

Cheesy Dog Biscuits

1/2 lb. cheese, grated
1 egg
1/4 C butter, soft
1/4 C corn meal
1/3 C oatmeal
1/2 C hot water
1/2 cube chicken bouillon
~ 3 C flour
a bit of salt


The flour can be all purpose or whole wheat. I used unbleached all purpose. I used mozzarella cheese, because I know that Atlez likes it, but any other cheese can be substituted. The mozzarella yielded a very mild cheese taste. I think cheddar would be better.

Dissolve the bouillon in the hot water and set aside. In a bowl beat butter until creamy, add the cheese, egg, corn meal, oatmeal and the bouillon, while beating. Then start adding the flour. Add just enough flour to make soft dough, still a bit sticky but not wet sticky. Separate the dough in 2-3-4 balls. Knead each ball with a bit of flour and roll out to 1/4 inch thickness and cut with a knife or cookie cutters. I like the heart-shapes because they can be easily broken in two. Ummm... this was really not a statement about broken hearts.... Bake at 375F until rosy, 25-30 minutes. Cool. Share.

For more dog treat recipes check out the following links:
Gourmet Sleuth
Bullwrinkle
Cheese Dog Treats

Read more ...

Saturday, October 10, 2009

Cream Puffs

Cream puff aka profiteroles have been on my to do list for a while. Actually ever since James sent me the table of ratios for different types of doughs from Michael Ruhlman's book "Ratio". I didn't even know how to pronounce "pate au choux" ... not sure I do now. But I know how to make it! After two batches of cream puffs based on two different recipes and two batches of pastry cream in less than a week I can confidently say cream puffs are my new favorite thing to make.

Pate au choux is a light pastry dough used to make not only cream puffs but also eclairs, croquembouches, beignets, gougeres, etc. According to its history on Wikipedia, the pastry was invented in 1540 by a chef of the Medici family, shortly after they all fled Florence. The name came much later, in the 18th century, when a patissier by the name Avice invented the Choux Buns and the name of the dough became pate au choux because the buns resembled little cabbages - choux in French. They really look like miniature cabbage heads, don't they?

The first recipe (let's call it Recipe A) came form Brown Eyed Baker's fantastic tutorial:

Pate Au Choux

2 large eggs + 1 large egg white (1/2 C eggs)
5 Tbs unsalted butter
2 Tbs milk
6 Tbs water
1 1/2 tsp sugar
1/4 tsp salt
1/2 C flour, sifted


The second recipe (Recipe B) comes from Michael Ruhlman's ratio approach:

Ratio Pate Au Choix

1/2 C butter
1 C water + milk
1 C eggs (3 large, ~5 medium eggs)
1/2 C flour, sifted
1 Tbs sugar
pinch of salt


The process of making the pastry is soooo simple. Heat butter, milk, water, sugar, and salt in a pan over medium heat, stirring until the butter is melted the mix starts to bubble. Take off the heat and immediately add the flour, stirring briskly, until a paste is formed. Return to low heat and stir until the batter is glossy and easily separates from the sides. Take off the heat, stir briskly to cool a bit. Then slowly pour in the eggs while stirring until smooth. The batter will be sticky, but thick. To make the puffs, transfer the batter to a pastry bag with a plane tip and pipe 1 to 1 1/2 inch mounds on a wax-paper lined baking sheet. Bake for 15 min @ 415F + 8 min @ 375F. Then turn off the oven, crack open the door and let the puffs cool in the oven. More detailed instructions can be found here.

Now, for the comparison. The two recipes actually had very different ratios of ingredients. The first recipe was 1:1:5/8:1 of liquid:egg:butter:flour, so almost 1:1:1:1. Michael Rulman advocates a very different ratio - 1:2:2:1, so the batter has a lot more egg and butter. In the end however, I was surprised at how similar the batters looked. They had almost the same consistency with B being sweeter and just a bit more runny and unable to hold height when piped. The baking results however were quite different. The puffs from Recipe A held their shape pretty well, puffed a bit but not too much and at the end of the baking were quite sturdy. The puffs from Recipe B puffed up like little balloons and even some of them merged together. They became huge! But at the end of the baking they were still quite moist and some of them collapsed as soon as they were out of the oven. Meh. I personally prefer the first batter though I would increase the sugar to 1 Tbs next time. Ruhlman's ratio works but it the result was not all that satisfying.

Now for the filling:

Pastry Cream

2 C whole milk
1/2 C sugar, divided
5 yolks
3 Tbs corn starch
2 Tbs unsalted butter

Additional for chocolate pastry cream:
3 Tbs cocoa
2 oz quality semi-sweet chocolate


Again, for more elaborate instructions check out Brown Eyed Baker's tutorial. Here is my brief summary: beat yolks + 2 Tbs sugar; add corn startch and beat until mixed well; heat milk + 6 Tbs sugar until boiling; over low heat add the yolk mixture to the milk in a thin stream while stirring well and keep stirring until the mix thickens and begins to bubble; take it off the heat and stir in the butter. For chocolate pastry cream, add the cocoa to the yolk-starch mix and add the chocolate with the butter at the end. Straining the cream is not a bad idea, because there are always lumps. Then cover with plastic wrap and refrigerate. Honestly, I don't know what cocaine tastes like but I can imagine it tastes like pastry cream. This stuff is so tasty it can be addictive. I am adding pastry cream to the list of foods I love, love, love, right next to Thai yellow curry, Monica's lasagna, James's risotto and the 9-grain bagels at Bentley's, among other things.

To finish thinks off, I recommend leaving the puffs uncovered overnight (to dry them even further) and the pastry cream in the fridge also overnight (to thicken and cool). Make little holes on the sides of the puffs and pipe the cream in, slowly and gently so that the cream doesn't come out squirting from the side. Eat as soon as possible - the longer they sit the soggier they get. Cream puffs week is over.

Read more ...

Puff Pastry! Wow!

The September 2009 Daring Bakers' challenge was hosted by Steph of A Whisk and a Spoon. She chose the French treat, Vols-au-Vent based on the Puff Pastry recipe by Michel Richard from the cookbook Baking With Julia by Dorie Greenspan.

As with some of the previous challenges, I was absolutely convinced this was not going to work. Not on the first try at least. Maybe on the second, most likely on the fifth try, but not on the first. The dough was a bit gummy, the day was hot, and I was covered in butter up to the elbows, watching Michel Richard roll out his pastry with unbelievable grace while I was huffing and puffing over mine. I have always thought that making puff pastry was the Holy Grail of baking. I love using it but never thought I would ever attempt to make it myself. So this challenge was really challenging. Long story short, my puff pastry turned out great, the Vols-au-Vents were fabulous and promptly disappeared at the party later that night, accompanied by "uhs" and "ahs" and marriage proposals.

I used Michel Richard's recipe, though I actually halved it (in case of complete failure I didn't want a pound of butter to go to waste):

Puff Pastry

2 1/2 C unbleached all-purpose flour
1 1/4 C cake flour
1 tbsp salt (half for sweet preparations)
1 1/4 C ice water
1 lb very cold unsalted butter

extra flour for dusting work surface


I am an impatient reader when it comes to cooking technique or I get lost halfway through (I also hate reading instruction manuals... don't ask how I put together my IKEA couch) so I loved watching the Julia Child + Michel Richard video instead. In fact I watched it a few times. Not only is it very informative, it is also very entertaining:

Michel: Do you like garlic?
Julia: Oh yes.
Michel: Me too. Of course it's hard to kiss your boyfriend after you've had garlic.
Julia: Unless of course he's had some too.

As a matter of fact I made the Tort Milanese last weekend and it turned out FAN-TASTIC!

If you are more of the instruction reading type of person though, here is a site you might enjoy: Baking911 (but beware of the crazy web design).

For the filling I improvised with what was available in my fridge. Considering I had just come back from a 12-day trip and was to be gone for another 5 day the following week, the choices were pretty slim - a peach, butter, cream cheese. So... how about peach cooked with sugar and cognac... topped with cream cheese frosting? Voilla!

Moral: Puff pastry is not as hard to make as most people think.

Read more ...

Monday, August 31, 2009

Dobos Torte

The August 2009 Daring Bakers' challenge was hosted by Angela of A Spoonful of Sugar and Lorraine of Not Quite Nigella. They chose the spectacular Dobos Torte based on a recipe from Rick Rodgers' cookbook Kaffeehaus: Exquisite Desserts from the Classic Caffés of Vienna, Budapest, and Prague.

I sure hope that starting the Monday morning with a piece of cake is a good sign for the week. It must be, especially if the cake is fantastically delicious like this one turned out. I am craving a second piece now... The Dobos Torte is a 5 to 12 layer sponge cake filled with chocolate buttercream and topped with wedges of caramel. From the Darling Baker's site: "It was invented in 1885 by József C. Dobos, a Hungarian baker, and it rapidly became famous throughout Europe for both its extraordinary taste and its keeping properties. The recipe was a secret until Dobos retired in 1906 and gave the recipe to the Budapest Confectioners' and Gingerbread Makers' Chamber of Industry, providing that every member of the chamber can use it freely."

I must admit I procrastinated on this one. Big time. It is August in Southern California and in my 1940's house with no central air-conditioning August is the month you give the oven a break. It has been so hot and with the wild fires raging just miles away, my enthusiasm to make a cake kept waning as the days of August kept slipping away. Also, I must admit, I found the recipe a bit intimidating. With all the measurements in grams and the equipment list as long as the Torah, my kitchen felt ill prepared for the challenge. But in the end, it all turned out well to my utter surprise, nothing was too hard to handle, the sponge was great and the cake is amazingly delicious. Maybe I'll go home for lunch and have another piece...

I only made half the recipe and cut the layers in rectangular shapes to simplify things. However below I am including the full recipe. The elements can be made separately and then assembled. Store the layers in the fridge between layers of parchment paper.

Dobos Torte

For the layers:
6 large eggs, separated, at room temperature
1 1/3 C powder sugar
1 tsp vanilla extract
1 C + 2 TBS sifted cake flour
pinch of salt


Preheat the oven to 400F. Beat the yolks with 2/3 C of sugar and the vanilla until the mixture is pale yellow and thin ribbons form when the beaters are lifted. In a separate bowl, beat the egg whites until stiff peaks form and then gradually add the remaining sugar. Gently fold the whites into the yolk mixture, not stirring completely. Sift in the flour and salt, a tablespoon at a time and incorporate very gently. None of that vigorous stirring here - you need to be very gentle. If you do not have cake flour do not despair - mix 3 Tbs corn starch and 13 Tbs regular flour and sift to combine.

Line a baking sheet with parchment paper. For the rectangular layers I spread the batter all over the sheet, not quite reaching the edges. I you want circular layers, then trace the circles (bottom of a spring-form pan) on the reverse side of the parchment paper and then spread 3/4 C of the batter very thinly to just fill the circle. Bake at 400F for 4 minutes. Once you start smelling the sweet aroma of the baked cake, the layer is ready. Repeat to make the rest of the layers - you need at least 6 of them. Cool very well. Once the layers are cooled, you can peel the parchment paper (carefully!) and trim them to the desired size and shape (I used a pair of scissors though they pinched the dough a bit at the edges).

For the buttercream:
4 large eggs, at room temperature
1 C sugar
4 oz bakers or dark chocolate, chopped
1C + 2 Tbs unsalted butter, at room temperature.


Beat the eggs and the sugar in a bowl until well mixed. Place the mix in a double-boiler or improvise one with a bowl nested in a pot and cook the mixture over water at a rolling boil for a few minutes until the mixture is hot to the touch, stirring constantly. Once hot, take the egg mix off the burner and stir in the chopped chocolate until it is all melted. Let cool. Beat the butter in the chocolate mix piece y piece and finish off on high until the mix is smooth and no butter lumps are visible. Refrigerate to thicken.

For the caramel:
1 C sugar
12 Tbs water
8 tsp lemon juice
1 tablespoon neutral oil


Line a baking sheet with parchment paper and oil it lightly. Place the best-looking layer on top (the layer better be at room temperature) and cut as desired - sections or strips or whatever. In a small pan combine the sugar, water and lemon juice. Heat at low until the sugar is melted and then crank up the heat and bring the syrup to boil. It will foam - that's ok, just make sure the heat is not so high that the syrup will boil out. Occasionally turn the heat down and check the state of the syrup. Eventually it will turn thick and brown. At that point pour it over the cut-up layer, using a spatula to distribute it evenly all over. You must be pretty quick because the caramel will start setting quite fast. Do not spread the caramel over the edges of the cake layer because that will make removal difficult. Let the caramel set and then peel the pieces off the paper.

Assembly: This should be pretty obvious. Layer-cream-layer-cream and so on till you run out of layers, frost the sides with the remaining cream, arrange the caramel pieces on top. Optionally, decorate the sides with chopped hazelnuts (I put some hazelnuts between the layers as well).

I would love to make this cake again! It looks very sophisticated but in the end it was not all that difficult to make. Next time I would probably skip on the caramel on top. I thought it really was not worth the trouble - it looks interesting but my caramel pieces were the dentist's nightmare and not really edible. The butter-cream was a bit on the soft side but maybe I did not cook the eggs enough. Anyways it was so delicious I licked the bowl twice. And finally, the hazelnuts were a great addition, on the sides and the top. If you would like to put them between the layers then they must be really finely ground - mine were a bit too chinky. All in all, a fantastic cake. Thank you, Daring Bakers!

Read more ...

Friday, August 28, 2009

Fig Bounty


A few weeks ago I was taking my car from the work parking lot when I noticed a large fig tree overhanging the lot, heavy with unripe figs. I thought how fabulous it would be when the figs started getting ripe. The roots of the tree were on the other side of the fence so the tree technically belonged to the house next door. So am I allowed to pick the figs or not, I wondered. My friend Jane was kind to inform me (after I had already done the deed) that according to an ancient Greek law, the fruit overhanging your property belong to you; besides, no one else (except the squirrels) were making use of them and these luscious, juicy black Mission figs were just falling to the ground. So I proceeded to harvest them quite regularly over the past two weeks.

After the first bowl of figs appeared in my fridge I realized I could not possibly eat them all. What to do with a boatload of figs? They are such delicate fruit with very subtle flavor, the best thing is to just pop them in your mouth, close your eyes and sink into heaven. They are best fresh and there are very few things that you can cook with figs. I browsed by cookbooks, I surfed the net, I was restless until I lined up 4 (yes, four!) recipes which I wanted to try.

First came the fig tart. I was responsible for buying food for the Friday social hour at work. If I make a pie just for the sake of making a pie, the poor pie will spend a month in my fridge. But if I bring it to Happy Hour, there will be 15 volunteers to take care of it. Muahahaha. The recipe came from Epicurious. Just read the name and you will be seduced: Fresh Fig Tart with Rosemary Cornmeal Crust and Lemon Mascarpone Cream. Oh, doesn't it just sound delicious?

Mascarpone-Fig Tart

For the crust:
1 1/2 C all-purpose flour
1/2 C yellow cornmeal (not stone-ground)
1 Tbs sugar
1/4 tsp salt
1/2 cup (1 stick) cold unsalted butter, cut into pieces
1 1/2 Tbs finely chopped fresh rosemary
3+ Tbs ice water

For the filling:
1/4 C plain yogurt
1 C mascarpone cheese (8 oz)
1/4 C sugar
1 1/2 tsp finely grated fresh lemon zest

1 1/2 lb fresh figs


This is made just like your regular tart. Mix flour, cornmeal, sugar, salt and butter, and rub between your hands until the mixture turns into pea-sized crumbs. Add the rosemary and start adding the water one Tbs at a time, until the dough can be collected into a ball. Don't knead. Press the dough into a pie pad and line the walls and sides with a thin even layer. This recipe produced a bit too much dough for my pie pan so I used the leftovers to line a little ramekin for a mini-tart. Poke the dough with a fork and line with foil...or don't - opinions are split on whether you should do that. Bake at 350F for ~25 minutes, until the rim of the tart starts getting golden. Cool well on a rack.

Make the filling: beat the mascarpone cheese, yogurt, sugar and zest together in a bowl for ~30 seconds until fluffy. To assemble, pour the filling into the cold crust, arrange the figs on top. The picture here shows the figs sliced, but I cut them into wedges and it worked just as fine. I didn't brush them with glaze either, but got no complaints.

The tart was fantastic! Everyone loved it and I got thanks for it even 4 days later. So it must have been good. Or people were just really impressed that I baked something. What I really loved about this recipe is how versatile the element are. I'd never thought of putting herbs in the pie dough, for example. I was not a big fan of this particular crust recipe (and will make sure I post my favorite crust recipe at some other point) but including rosemary, basil or thyme in the crust, especially for a quiche or a savory pie would sure be fabulous. Also the filling was to die for! I couldn't get enough of it! (By the way, Trader Joe's carries mascarpone cheese, which is like cream cheese but better). It can be paired with any other fruit - Andrea suggested fresh raspberries, I also think peaches, strawberries, blueberry compote would go just fine on top of this filling. Ah, just more ideas for tasty things to bake!

Following the tart, I proceeded to make two types of fig jam and one type of fig preserve. Woah! That was a lot of work, but the results are so delicious, I can't wait for the winter to come so that I can start opening the jars. (Yes, I have a rule that no jams should be eaten if fresh fruit are available.) First I made the Spiced Microwave Fig-Orange Jam by Elise on Simply Recipes. I know, jam in the microwave?!? It worked great but if you want to boil it on the stove in the spirit of tradition, then go for it. Then I made the preserve with whole figs, which turned out very much like the fig preserves my mom used to make. Finally I made the spiked fig jam (spiced, spiked, I hope I don't get them confused in the cupboard). To prepare the figs for jamming, cut off their tails. I found two different suggested methods on washing the figs - pour hot water on them or wash them with cold water and baking soda. I used the former for the jams and the latter for the preserve.

Spiced Microwave Fig Jam

2 C (well packed) diced fresh figs
1/2 C seeded, peeled orange, diced
2 C sugar
the zest of 1 lemon
3 Tbsp lemon juice
1/4 teaspoon ground ginger
2 cloves (which I forgot to pull out at the end... or ground)
1/4 teaspoon cinnamon

2 8oz jars & 1 4oz jar


Combine all the ingredients in a microwave-safe bowl, stir and let sit for ~30 min. Place in the microwave and set on high for 20 minutes. As soon as the mixture starts boiling (after 6-7 minutes), stop and stir. Keep stirring every 2-3 minutes and keep an eye on it so it does not boil over. It is ready when it has boiled down to 2/3 of its original volume. You can also check for done-ness using the wrinkle test shown here. Don't just rely on the thickness on the jam because it will thicken as it cools.

While the jam is making (and this is true for jam and preserve recipes), sterilize your jars in a large pot with boiling water. Just let them simmer. They should be well covered with water. Sterilize the lids and bands as well. Once the jam is done, pour it into the hot jars (use a towel or oven mitts), wipe the mouth clean with a paper towel, place the lid on top and screw on the band as tight as you can. Place the jars in a pot of hot water (yes, you can use the same pot of hot water) and bring to boil. Simmer for 10 minutes. Maybe this double sterilization is an overkill - sterilize the jars and then boil the jam too - but I'd rather be safe than sorry. Pull the hot jars out of the water and let them cool on a towel (don't place the hot jars on the cold counter-top - they might crack!). Count the pops.

I liked the jam. The spices were very light. On first taste they still seemed to overpower the figs a bit, but things improved when the jam cooled The orange was hardly noticeable. The consistency was fantastic - the vigorous boiling the the microwave made for a very smooth jam.

Along a similar line comes the Spiked Fig Jam. I love adding alcohol to food - it imparts fantastic flavors even if a small quantity is used.

Spiked Fig Jam

1 lemon
4 1/2 C fresh figs, chopped and loosely packed
2 C sugar
1/3 C brandy or Cognac
2 Tbs lemon juice (from the same lemon)
1/4 teaspoon coarse salt

3 8 oz. jars


Peel the lemon (thinly, with a potato peeler) and chop the rind into matchsticks. Combine all ingredients in a pot and let them sit for ~1 hour. Bring to boil over medium heat. Turn heat to low and simmer for ~30 minutes, stirring frequently and mashing the fruit. After the 30-minute mark, start checking for done-ness. Again, the jam will thicken when it cools. When the test comes out positive, turn off the heat and pour the jam into sterilized jars. Put on lids, screw on bands and boil the jars for ~10 minutes to finish off sterilization.

This jam turned out sooooooo incredibly good. I barely had the will power to leave some for James to try. I could have easily polished it off.

Finally, the fig preserve. I've always been befuddled by the differences between preserves, jams, marmalades and such. I am learning my way around them as I am making them - while jams are basically purees, preserves keep the fruit whole submerged in a sugar syrup. This old-fashioned fig preserve reminds me of the one my Mom used to make. It takes a long time to boil down so arm yourself with patience.

Fig Preserve

4 C whole figs
2 C sugar
3 lemon slices, seeded
1 C water
pinch of salt

2 8oz jars and 1 4 oz jar


Combine all ingredients in a pot, stir well and bring to boil. Reduce the heat and simmer, stirring occasionally for at least one hour. Continue simmering until the syrup passes the wrinkle test. Pour into sterilized jars, cap, screw the bands on and boil for 10 minutes.

Phew, that was a huge adventure! So much jammin' my head started spinning. And as if that wasn't enough I had another bowl of figs left. In a final act of desperation I decided to dry them in the oven. It took two nights with the oven turned on the lowest setting, probably 100F, to get most of the moisture out, to get the figs all dry and shriveled. All right, that's enough. I'm done.

And if that was not enough for you, here are a few more fig ideas:
Pizza with Figs, Prosciutto, Gorgonzola, Balsamic, and Arugula
Candied Fig, Hazelnut and Orange Cheesecake with Port Sauce
Warm Black Mission Fig, Walnut Crunch, and Blue Cheese Tartlets
Fresh Figs with Goat Cheese and Peppered Honey
Fig-Sesame Jam

Read more ...

Monday, July 27, 2009

Chocolate-Cherry Milano Cookies

The July Daring Bakers' challenge was hosted by Nicole at Sweet Tooth. She chose Chocolate Covered Marshmallow Cookies and Milano Cookies from pastry chef Gale Gand of the Food Network.

This is my first Daring Bakers challenge and I feel seriously embarrassed to be flunking it a bit but the result is edible if not as pretty as I had hoped.

On the scale of one to ten of biblical disasters, making these cookies was probably only 1.5. Still I could have easily done without the excitement. It all started with grandiose plans (as all disasters usually do) to make a few different variations of the cookies - some original ones, some black and white ones, some chocolate cherry ones and to color some of the cookies red to match the cherry filling. It all sounded great and I was already imagining treating myself to one of these wonderful cookies along with my coffee on Monday morning (which I did anyways), but my plans deflated as soon as I popped the first pan in the oven .... and the cookies turned into crapes. Things kept going downhill when, after removing the cookies from the oven, I discovered they were glued to the parchment paper and there was no way to remove them from it. Nothing personal against parchment paper, but I prefer my cookies without it. I managed to salvage one cookie. But I was already out of the white batter. Oh well.

I figured I needed to add more flour (maybe too much of egg whites) which I did, realizing along the way that what I had hoped would be red batter was turning bright pink. To make up for it, the chocolate batter was tasty as hell (mmmmm, coooookiiiie baaaaatter). The pink and brown cookies turned out better if a bit too thick. Finally, I ended up with something more resembling deflated macaroons than Milan cookies. I did stick them together with chocolate and cherry jam, so they are chocolate cherry flavored, which I think worked out fabulously - I love the combination of the two flavors. Lesson learned: store bought Milano cookies are better. However, If you are not convinced, you are welcome to try this for yourself. Here is the recipe by Gale Gand on the Food Network site.

Read more ...

Tuesday, July 21, 2009

I-Miss-Tucson Triple Chocolate Cinnamon Cookies (First Attempt)

It has been almost four months since I picked up and moved from the scorching heat of Tucson, Arizona to the green lawns of Los Angeles, California. Despite the fact that I have moved to better weather and a better job, I am still missing Tucson a whole lot. One of the things I miss the most (along with that special someone) is the Bentley's House of Coffee and Tea, the place where I spend the last three months of grad school and a significant fraction of the previous six years too. I am really more productive when there are people around me, when there is talking and music and interesting faces to secretly stare at for distraction. The quiet unnerves me and the hustle and bustle of the cozy coffee shop were a fantastic escape. Being able to get a huge mug of hot coffee and a bagel (ah, those fabulous 9-grain bagels) any time during the day was also a big advantage. Last but certainly not least was their fabulous selection of cookies. Mmmmm, cookies! Especially the triple chocolate cinnamon ones which I discovered one cold December day last year. And my life was changed forever. Seriously.

A few days before I moved away I asked the owner for the recipe. She refused politely but ensured that a big jar of cookies was supplied the next day which was sweet but I still wanted the recipe. And then I found this recipe on Epicurious. Aha! So here is my first attempt at making these cookies. I didn't quite follow the original recipe because of limitations on the available ingredients so here is what I did:

Triple Chocolate Cinnamon Cookies

1/4 C + 1 Tbs flour
1/4 C unsweetened cocoa
1 1/2 tsp ground cinnamon
1/4 tsp baking powder
pinch of salt
6 tbsp (3/4 stick) unsalted butter, room temperature
3 Tbs sugar
1/2 C packed brown sugar
2 large eggs
8 ounces semisweet chocolate, melted and cooled
1/2 C (3 ounces) chopped milk chocolate (or chips)
1/2 C chopped walnuts, raw


Preheat oven to 350F. Line cookie sheets with parchment paper. In a small bowl mix flour, cocoa, baking powder, cinnamon and salt and set aside. In a big bowl beat the butter and sugar until creamy. Add the eggs and beat till smooth. Add the melted chocolate and mix in. Add the dry ingredients in two batches, beating until incorporated. Stir in the milk chocolate pieces and walnuts. The dough is done.

Shaping the cookies can be done in two ways - ice-cream-scooping and slicing. I did the latter because I didn't have time to bake the cookies on the evening I made the dough. The scooping is easier: scoop level ice-cream scoops of dough and place them on a parchment-paper, 2-inches apart because cookies will spread. Bake for 12 minutes in the lower third of the oven. Cookies will be a bit soft to the touch and glossy. Let them cool on the pan for a few minutes and then cool completely on a rack. The slicing method is messier because the dough is very soft and sticky. Roll the dough into two logs about an inch and a half in diameter (or bigger if you want bigger cookies) by wrapping it in parchment paper and rolling it. You are bound to have chocolate behind your ears. It's ok. Once the logs are shaped wrap them in plastic wrap and place them in the freezer. The dough can stay in the freezer for a few weeks... if you can wait that long. To bake the cookies, slice the logs into 1/4-inch slices and place on a parchment-paper-lined cookie sheet. Bake for 12 minutes, cool on pan and then on a rack. Eat.

These cookies turned out sooo fabulous! They were soft and chewy, chocolatey with just the right amount of cinnamon and walnuts, so delicious, I could not have just one. Everyone loved them. So did I but they were not quite what I was shooting for. The Bentley's cookies are drier, less chewy and they crack on top. I think I will try making them with all white sugar and adding some more flour next time. I'm going to work on these. Come Christmas, I'll have them perfect!

Read more ...

Friday, July 10, 2009

Birthday Brownies

For some reason or another I have always had home-made birthday cakes. I remember the checkered cake I always begged my Mom for when I was little, and the sponge cakes my Grandma used to make, decorated with red and yellow raspberries like strings of Christmas lights in June. But at the point when one pack of candles is no longer enough to mark my age, birthday cakes have lost their charm and birthday celebrations have become more like an avoidance there of. Instead of a celebration, I try to do something fun and memorable. I had planned to run a marathon this year but with the stress of the last three months my training fell off track big time. BIG time! In place of marathoning, I managed to convince several of my friends to go chasing bears (literately and figuratively) in the Sierra Nevadas over a 36-mile hike. And to fuel the hike I lugged a pack of brownies in place of a cake. Yeah!

You might hate me for saying this, but in my opinion as far as deserts go brownies are usually just too much - too sweet, too choclatey, too sticky. But these ones I like. They have more of a cake consistency and don't feel like a cubic inch of a heart attack. I would like to make them with chopped dark chocolate instead of chocolate chips next time. And unless it is agains your religious convictions, do add the walnuts! The recipe is from King Arthur (and can be found on the back of their flour packs). Yep, that's right, King Arthur made brownies.

Best Brownies Ever

1/2 C unsalted butter
1 C sugar
2 large eggs
1/2+ C Dutch-process cocoa
1/2 tsp salt
1/2 tsp baking powder
1/2 tsp instant coffee powder (optional)
1/2 tsp vanilla extract
3/4 C all-purpose flour
1 C chocolate chips
1/2 C walnut pieces


Preheat oven to 350 F and lightly grease an 8x8 inch pan. Place butter in microwave safe bowl and melt in the microwave (watch it - 20 seconds are usually enough). Add the sugar, stir and return to microwave for for another 20 seconds, stir and keep heating and stirring until the mixture is hot and glossy but not bubbling. In another bowl mix the next six ingredients (eggs through cocoa) and add the hot butter while stirring. Add the flour and stir till smooth. Fold in the chocolate chips and the walnuts. Pour in the pan and bake for ~30 minutes, until a toothpick comes out clean. Let them cool well before cutting. If you can.

Read more ...

Monday, June 1, 2009

My Favorite Pizza Dough

Some days it is hard to believe that all problems will inevitably be solved and life will get better - apartment hunting is not going all that well, James left town and, most importantly, last night's amazing pizza is gone. I was so sad that I got some shopping therapy... at Trader Joe's. I got some olive oil, balsamic vinegar and milk. And I'm feeling all better now.

I am afraid a lot of people think of pizza as the greasy stuff you order when there's nothing in the fridge (Brooklyn Pizza and Maggpie's are very much excluded from this generalization). Also a lot of people think that making pizza is very hard and time consuming. I am going to try to convince you that this is not the case and that amazing, tasty pizza can be made with minimal effort and ingredients so that you should never have to order the greasy cheesy stuff ever again.

I love making pizzas in the summer, when there is an abundance of fresh vegetables to top them with. I have been using this recipe for about a year now and have made a dozen pizzas, all of them very much successful. The crust itself is so good, it can be eaten all by itself with little more than olive oil, salt and an herb of your choice on top. The recipe is originally from Epicurious:

Pizza Dough

1 envelope active dry yeast
3/4 C lukewarm water
1 tsp sugar

3/4 tsp salt
2+ C flour
3 Tbs olive oil
a bit of cornmeal


Preheat the oven to 450F. Dissolve the yeast and sugar in the water and leave aside for 5-10 minutes until it gets a bit frothy on top. In a big bowl make a well in the 2 C of flour and pour in the olive oil, salt and the yeast mixture. Mix first with a fork until all flour is incorporated. Then flour your hands and knead adding a bit more flour until the dough is not as sticky, but it should still be soft - I usually end up adding another tablespoon. Kneading should be about a minute. Grease the dough with some olive oil, place in a bowl and cover with plastic wrap. Let it sit and rise while you are preparing the topping.

To make the actual pizza, punch the dough down and knead into a ball on a floured surface. The dough must be soft and all surfaces and hands should be well floured to avoid sticking. Roll it out with a rolling pin (also floured) or just pull it with your hands. It needs to be very thin, almost transparent. Oil the pan/stone and sprinkle with cornmeal. Place the dough on the pan and oil the top a bit. Place in the oven and par-bake until the top starts getting a bit rosy. At this point you may add your toppings and bake for another 5-10 minutes until heated throughout. Voila.

Here are some topping ideas - I am a fan of simple pizzas where you can savor the flavors of the ingredients and not get lost in them:

Tomatoes, mozzarella & basil. Slice 2-3 tomatoes, 3 balls of mozzarella and tear the leaves of a bunch of basil. Toss everything with olive oil. Arrange on top of pizza and salt. Eat right away or bake until tomatoes are soft and mozzarella is melted.

Potatoes and rosemary. Parboil potatoes, peel and slice thinly. Toss with a rosemary, salt and olive oil. Arrange on top of the pizza. Bake. (You can add some sort of cheese id you want.)

Three cheeses. Spread tomato sauce (pasta sauce from a jar would work too). Arrange slices of mozzarella and parmesan and crumble ricotta on top. Bake until the cheeses are melted. Sprinkle chopped fresh basil on top before serving.

Caramelized onions and cheese. Slice thinly 3 heads of onion. Caramelize. Spread onions on top of the pizza and randomly distribute slices of Gruyere or parmesan on top of them.

Of course, the possibilities are endless - more ideas can be found here, here, here (grilled pizza, lots of ideas in the comments), and here (including a recipe for Arizona Pizza).

Read more ...

Thursday, May 14, 2009

Mmmmm, warm scones!

The recipe for these in the Leithis Baking Bible starts like this: "Traditionally, scones are served at tea time. Scones are at their best if they are mixed and cooked quickly as any rising agent in them will start to work once the liquid is added. [...] Ideally they should be served warm from the oven. " Hmmmm. Doesn't that sound just great? A recipe which, unlike my mother, encourages you to eat the product of your efforts straight from the oven. I'm in!

Sweet Scones

8 oz self-rising flour
1/2 tsp salt
2 oz cold butter, cubed
1 oz caster sugar
5 oz milk
1 egg (for brushing)


These are made in the traditional scone method which is as follows: Place all dry ingredients in a bowl and mix with a wooden spoon or whisk (to aerate). Add the butter and mix in with the dry ingredients using a pastry blender or two knives or your fingertips until small crumbs are formed but do not overmix. Make a well out of the crumbs and add the milk (at room temperature). Gather into a soft dough. Transfer to a floured surface and knead just long enough to form a ball. Roll out thick and either cut out shapes with a floured cookie-cutter or cut into triangles. Place the scones on a parchment paper-covered cookie sheet and brush lightly with the egg and sprinkle with sugar. Bake at 375F until golden.

The most important rule is "handle the dough as little as possible". Also "act quickly". I think I made a double batch and also I added the zest of one lemon (two would have been better). They were fantastic eaten warm with butter, while drinking English breakfast tea! It's been a couple of months now but I still fondly remember that breakfast!

While I was researching this post, I came across this Scones Newsletter on the Joy of Baking, which is full of interesting scone-related recipes and further advice.

Read more ...

Saturday, March 28, 2009

Biscotti, Revisited

Sometimes the stars somehow align and I come across several recipes for one and the same thing within a couple of days. It must be bound to happen, I think then, and turn on the oven. Such was the story of these two biscotti recipes. I came across the chocolate biscotti on David Lebovitz's blog and then I came across the Twice-baked Cookies in Ursila Ferrigno's book La Dolce Vita (absolutely fantastic book by the way). Or maybe it happened the other way around. Anyways, biscotti were in the star.


Twice-baked Cookies

280g/10oz plain white flour
140g/5oz caster sugar
2 eggs
1 egg yolk
1tsp vanilla extract
115g/4oz blanched slivered almonds


Preheat oven to 350 degrees. Combine all ingredients except the almonds and mix well by hand. Add the almonds and mix until evenly distributed. Collect into a ball and divide in 2 or 4 balls. Shape each ball into a cigar shape and place on a parchment paper-lined baking sheet. Bake for 20 minutes. Take out of the oven and slice each "cigar" into 1-inch slices. Place sideways on the baking sheet and return to the oven for another 10-15 minutes, until golden.

Chocolate Biscotti

2 cups flour
3/4 C top-quality cocoa powder
1 tsp baking soda
1/4 tsp salt
3 large eggs, at room temperature
1 C sugar
1 tsp vanilla extract
1/2 tsp almond extract
1 C almonds, toasted and very coarsely-chopped
3/4 C chocolate chips


Preheat oven to 350 degrees. Combine the eggs, vanilla, sugar and almond extract. Sift in the flour, cocoa powder, salt and baking soda. Mix well. Stir in the chocolate chips and almonds until evenly distributed. Shape dough in 2 long logs and bake for 25 minutes. Again slice logs into 1-inch slices and return to oven for another 10 minutes.


These turned out so different! Like night and day! The chocolate biscotti were very crisp and airy and also very, very hard! The plain ones were softer and a bit chewy, even. We had made some coffee ricotta to go with the plain ones but it really wasn't necessary, they were great by themselves. The chocolate ones were fantastic with coffee and hot chocolate but a little dangerous on their own. I wonder how many different biscotti recipes are there? These weren't just different flavors from the ones I made back in December, they were completely different cookies - different texture, crumb. All great but so different. I think Ursula Ferrigno's ones are my favorite so far!

Read more ...

Friday, December 26, 2008

(Mexican Wedding Cookies) x 2

On the Friday after Thanksgiving, I was sipping a beautiful dark ale and lounging over at Maggie and Aleks' house, when Maggie asked me if I plan on baking Christmas cookies. I wasn't planning. In fact, I have never baked Christmas cookies. But after Maggie enumerated all the fancy cookies she had baked last year (I must admit I helped with the eating...) I gave the idea a more serious thought. Six batches of cookies later - biscotti, nut-bars, chocolate cutouts and all - I am completely cookied out! Of them all, I think the two batches of Mexican Wedding cookies were my favorite! They were not all too sweet and their texture was so fragile, they melted in your mouth, one batch was cheered by cranberries, the other batch nutty with pecans, both of them to die for!

The first recipe came from Epicurious.com's collection of 25 Days of Christmas in cookies - Pistachio and Cherry Mexican Wedding Cakes. These looked snow covered and wintry. I wanted to make something without nuts so I skipped the pistachios and substituted cranberries for the cherries. The red and white combination made them even more festive!

Cranberry Mexican Wedding Cakes

1 C (2 sticks) unsalted butter at room temperature
1/2 C powdered sugar plus more for coating
1 Tbs vanilla extract
1/2 tsp salt
1/2 to 1 C dried cranberries, chopped
2 1/2 cups sifted all purpose flour
(Makes ~40 cookies)


Preheat oven to 350F. Beat butter and powder sugar until fluffy. Add the other ingredients in the order listed but don't overmix. The dough will be crumbly. Shape the cookies into ovals by squeezing a Tbs of dough in the palm of your hand. Place cookies on a parchment-paper-covered baking sheet. These do not expand during baking and can be pretty close to each other. Bake for 16 minutes, until the bottoms are very slightly browned. Cool for a bit and roll in powdered sugar while still warm.

Alright, they were not the prettiest of cookies, but they were tasty! A couple of days later, when these were all devoured and given away, James came back from visiting his family and treated me to one of his Mom's cookies. I begged for the recipe.

James' Mom's Mexican Wedding in Wisconsin Cookies

1 C butter (2 sticks), softened
6 Tbs powdered sugar
2 tsp vanilla extract
2 C sifted all-purpose flour
1 1/2 cups pecans, chopped very fine
(Makes ~60 cookies)


Mix all ingredients into a dough same as above, form into a ball and chill four a couple hours. Roll the dough into 1" balls (or crescents) and place on a parchment-paper-lined baking sheet. Bake for 12 minutes at 375 F. Let them cool slightly, then roll them in powdered sugar.

Do they really eat these at Mexican weddings? I have never been to a Mexican wedding (I bet it is a lot of fun) - maybe they do, maybe they don't. Turns out the name of the cookies is not necessarily connected to our Southern neighbor. Buttery cookies, containing finely ground nuts and rolled in powdered sugar appear all over the world - Russian Tea Cakes, Danish Almond Cookies, Spain's polvornes and Finnish Butter Strips. Still other names for the same cookies are Nut Butter Balls, Almond Crescents, Napoleon Hats or Melting Moments (I like this last one). It seems like the cookie is old, but the name is new. The first mentions of Mexican Wedding cookies appear in the 1950's. Some sources suggest that then, at the cusp of the Cold War, calling them Russian Tea Cakes would have been a bit inappropriate (and possibly a poor marketing pitch) so a new, politically correct name was invented. Some recipes from the 50's and 60's can be found here (note that many of these recipes ask for margarine; do substitute with butter for goodness sake). Whichever name you choose to call them by, these are some tasty cookies!

Read more ...

Biscoctus Biscotti


In all honesty, i had somehow managed to go through most of my life without discovering biscotti. I even managed to live for a month in Italy without having a single one. Granted, it was June and I was distracted by gelato, Baci chocolates and good-looking Italian men. And until a few weeks ago I had no clue they belonged to an extensive class of "double-baked" cookies. So when I was flipping through the cookie section of The Baker's Dozen Cookbook (my new favorite desert book!) and came across the biscotti recipe I immediately decided I had to make them. Two batches later, I am hooked. They are great and easy to make. The double-baking makes them last forever though that doesn't make much sense around here because they seem to disappear within days...

According to Wikipedia, the word "biscotti" (pronounced [bis-COT-tea]) in Italian is the plural form of biscotto, which applies to any type of biscuit, and originates from the medieval Latin word biscoctus, meaning "twice-baked": it defined biscuits baked twice in the oven, so they could be stored for long periods of time, which was particularly useful during journeys and wars. Through Middle French, the word was imported into the English language as "biscuit". Frequently the term "biscotti" is taken to refer to a specific type of hard almond-flavoured biscuits traditionally served with vin santo, probably originating from the town of Prato and therefore still known as "biscotti of Prato". In general, biscotti is more a method of preparation, rather than a specific recipe, as pointed out by Laura Schenone from Jellypress.com in her history of biscotti. She also points out the fact that biscotti are usually first baked at high temperature and then on low temperature - probably a consequence of how wood-burning ovens work.

While keeping their hardiness, biscotti today seem to be very different from their ancient predecessors. They are buttery, usually studded with nuts and sometimes covered in chocolate. We are so spoiled, I don't think we would have them any other way.

Chocolate-Hazelnut Biscotti

2 +1/2 C flour
1 1/2 tsp baking powder
1/2 tsp salt
1/2 C butter (1 stick)
1 1/4 C sugar
2 large eggs
2/3 C hazelnuts, roasted, chopped
1/3 C quality semisweet chocolate chips


Preheat oven to 300F. Sift flour with baking powder and salt, and set aside. Beat butter and sugar until combined (1 minute) - do not overbeat, you don't want to incorporate too much air. Add the eggs one at a time. Add the flour and blend until almost combined, add the nuts and chocolate and mix well. I thought that 2.5 C of flour were a little too much so go easy on the flour at the end, you do not want crumbly dough. Divide the dough in half. Wrap each half in a plastic wrap or parchment paper and roll into a long log, about 14 inches long. Place the two logs about 4 inches apart on a big baking sheet, lined with lightly oiled parchment paper. Bake, turning the sheet around halfway, for 1.5 hours. Remove from the oven and let just cool slightly. Slice carefully into 1/2-inch thick slices using a serrated knife. Return the cookies to the baking sheet, laying the flat and return to the oven for ~10 minutes, until golden. The oven can be turned off before placing the cookies inside. Cool and story in a tin box.

These were marvelous! Crisp but not too hard. They can be eaten as it is or dipped in tea, coffee or hot chocolate. Oh, I love the combination of chocolate and hazelnut, it makes me think of Nutella. Just smelling these is heaven! The variations offered include pistachio-raisin (2/3 C pistachios + 1/3 C raisins in place of the chocolate and hazelnut), pine nut-orange (1/3 C tasted pine nuts + 1/3 C candied orange), and the classic almond anise biscotti (1 C almonds + 1 tsp anise). What other flavors can be made? Any ideas?

Read more ...

Wednesday, December 10, 2008

Cupcakes: The Ultimate Edition

Over the last six months I have taken up ultimate frisbee and I am loving it! Great exercise, exciting game and awesome people. Today was the end of the fall season and my team - Vodka Rain (don't ask) finished 3rd ... or 4th... Does it matter? I loved my team! I was happy to meet all these guys and be on the team - everyone was so much fun and at the same time we were actually really good! Here is our team picture. Again, don't ask.


My contribution to the team? Scoring half a dozen points and cupcakes. I am still to figure out where exactly I need to be and my forehands still wobble and flip, but I damn well know how to bake a proper batch of chocolate cupcakes! Even better - chocolate-mint cupcakes, which I took to the game tonight. These are so delicious and so infallably good I must have made them a dozen times! The recipe for the cupcakes, again from Vegan Cupcakes Take Over the Cake (I love this book!) can be found here: Basic Vegan Chocolate Cupcakes. The frosting is simple buttercream which I have discussed in great detail here. To the buttercream I added a 1/2 teaspoon peppermint extract and ~1/2 C crushed candy canes. The decorating style (described in the book in connection with the Tiramisu Cupcakes, yum too!) is simple, yet very pretty and I use it as often as possible: with a small knife cut out a cone from the top of the cupcake; put a dollop of frosting and press the cap back on; finally put a smudge of frosting on top of the cap. I sprinkled them with more crushed candy-canes (used a total of 4 candy canes) and red sugar. Very pretty! And Christmassy too! Enjoy!

Read more ...

Thursday, December 4, 2008

In Honor of Federico

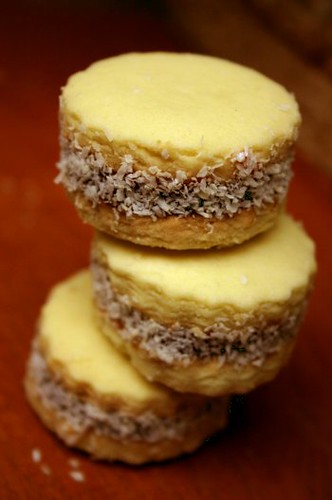
This post started a long time ago. September 29th to be more precise. I made alfajores and we went to see Federico Aubele and had a great time. I wore a pair of heels in the hopes I will get to dance some tango but instead ended up bear foot, heels in hand. There was a guy in front of the theater begging for money with a sign "why lie, it's for booze" and we bumped into Federico on the corner and I told him how much I loved the show. Then, I woke up the next day to find that my car had been broken into and shortly after left for Chile where I ran into an avalanche of alfajores and never came back to finish this adventure into South American cuisine. Until now. Here is the original post and below it is the continuation.

"I had never gone to a concert to just see the opening act. Until last night that is, when I joined a few friends to see Federico Aubele. I love his music, especially the tango inspired, melancholic pieces on "Grand Hotel Buenos Aires". They were fabulous live! I so much want to go back to dancing tango, I miss it so much! But, anyways, this blog is not about music or dancing but about food - in honor of the concert I decided to cook something from Argentina. After exhaustive exploration of Argentinian cuisine I zeroed in on Alfajores, a type of shortbread cookies with many variations which nevertheless seems like a favorite. I chose a recipe which uses corn starch from Pin In the City:"

Alfajores de maizena (Argentinean Alfajores)(~25 cookies)

3/4 C flour
1 1/4 C corn starch
1/4 tsp baking soda
1 tsp baking powder
1 stick butter (1/4 C)
3/8 C sugar
3 egg yolks
1 tsp cognac/whiskey/rum
1 tsp vanilla extract
zest from 1/2 lemon
For decoration:
dulce de leche
toasted coconut
chocolate


Deep down these are really shortbread cookies, but more than half of the flour has been substituted with corn starch, and they have fancied themselves up with some liquor and lemon zest. The texture was slightly different than the usual shortbread cookie... maybe a little finer, more fragile. Prepare them the same way as described here. Chill the dough for a bit and then roll out as thin as possible. I found the dough hard to roll out so mine didn't turn out all that thin but I saw lots of cookies of similar "thickness" on the webs so I couldn't have done all that poorly. Cut out circles or other shapes (I used a 1.5 inch brandy glass) and arrange on a wax-paper-lined baking sheet, giving them some space. Bake for 15-20 minutes at 350F. They should be white not golden and the bottoms should be slightly brown. Do not overbake or they will end up too hard. Cool. Sandwich them with 1 tsp dulce de leche and powder them with sugar, roll edgewise in shredded toasted coconut. Or glaze with melted chocolate... or both. Why not.

Now, Argentinean Alfajores are complex... almost sophisticated. The cookie is crumbly, stuck together by the dulce de leche, and the flavors of caramel, coconut, lemon and rum merge beautifully. Ah.

But then come the Chilean Alfajores. At first I was a little disappointed, but then I realized they are a completely different beast. Chilean Alfajores have one goal in their lives - delivering a shot of dulce de leche directly to your blood stream! And while they look similar and have the same filling, this is where the similarities end. Here is the recipe from the Chilean dulce de leche can:

Alfajores de Chile(25-30 cookies)

5 egg yolks
1/2 C all purpose flour
1/2 C corn starch
1/2 tsp baking powder
2 Tbs orange juice
1 can dulce de leche
powder sugar for dusting


These are just bare bones wafers! Not even sugar in the cookies! Mix the first five ingredient and knead into a very soft dough. Cut in two and roll out as thin as possible on a floured surface. Be careful because the dough has a very high stickiness factor! Unlike the dough for the cookies above, this one was very malleable and rolled out nicely. You want saltine cracker thickness. Again, cut, place on a wax paper-lined baking sheet and bake 5-7 minutes at 300F. The cookies will be hard and very slightly golden but mostly white. Cool and sandwich with the dulce de leche. Dust with powder sugar. Eat.

See? I told you. Simple dulce de leche delivery mechanisms. No fuss, no complications.

Either way, the bottom line is that alfajores are fabulous. Amazing. And I feel like dancing tango again. Ah. I think there is one more cookie left.... I'll take what I can get.

Read more ...

Wednesday, December 3, 2008

Finally! Cupcakes!

A few weeks ago while biking with James, he told me about this great way to make butternut squash puree without the whole peeling and cutting torture - cut the squash in two lengthwise, remove the seeds, place cut-side down in a baking pan and pour in half an inch of water and stick in the oven for 1-2 hours at ~300 F, cool, scoop out the flesh, done. No, I am not kidding, we do actually talk about butternut squash and chocolate and white truffle oil and beans and mushrooms while we bike. Which explains why I end up eating three breakfasts on bike-ride days. Eager to try the idea, I applied it to a fairly big specimen of of the butternut family and now I have two boxes of pumpkin in the fridge. What to do with it? Pumpkin-chocolate chip cupcakes of course! These delicious winter treasures have been made a few times already and they go perfectly well with both a mug of hot chocolate or a mug of tea. The recipe below is tweaked to my liking from Vegan Cupcakes Take Over the World.

Pumpkin Chocolate Chip Cupcakes with Cinnamon Icing

1 C pumpkin
1/4 C soy milk (+some)
1/3 C canola oil
1/2 C granulated sugar
1 tsp vanilla
1/2 tsp baking soda
3/4 tsp baking powder
1/2 tsp cinnamon
1 1/4 C flour
1/2 C chocolate chips

Icing
1-2 Tbs melted butter (or margarine to keep the vegan)
1 Tbs soy milk
1/2 C powder sugar
1/2 tsp cinnamon


Notes: I prefer using vanilla soy milk - it adds to the vanilla flavor. I also used the home-made pumpkin mush, but canned pumpkin works just as well. I used semi-sweet chocolate chips. I wouldn't recommend that you use very dark chocolate because the cake itself is not very sweet and the chocolate makes up for that. I think I will try making these with brown sugar next time.

Heat oven to 350 F. Mix pumpkin, oil, soy milk, sugar and vanilla in a bowl. Stir well. In another bowl combine the dry ingredients - baking soda, baking powder, cinnamon and flour and stir. Add the dry ingredients to the wet mix carefully stirring with a spoon or fork (not a mixer). The amount of liquid in the batter depends on how watery the pumpkin is so if the batter gets too thick splash some more soy milk in. You want the batter to be thick but not hard to stir. Finally, fold in the chocolate chips. Line a cupcake pan and divide the batter evenly. Bake ... I dunno... ~30 minutes, until a toothpick comes out clean (which is a little tricky because of the chocolate) or the tops spring back when pressed. Better underbake a little to keep them moist.

To make the icing, stir all the ingredients in a bowl. The icing should be thick and dull looking. If it is glossy, add some more powder sugar. Keep at room temperature. Drizzle generously over the cupcakes after they have cooled (use left-overs on ice cream). Or if you'd rather skip the icing, sift some powder sugar and cinnamon on them... or, whatever, just eat them like they are.

Read more ...

Friday, November 28, 2008

Giving Thanks

I give thanks for the pumpkins (technically butternut squash), for the chocolate, for the beans. I give thanks for all the delicious food on my table and for the food that is burnt, overcooked, undersalted and the lessons learned along the way. I give thanks for having a roof over my head, a soft bed, a spacious kitchen. I give thanks to my housemates who bear with me and wash some of my dishes. I give thanks for having wonderful friends whom I love very much. I give thanks to whoever needs to be thanked that my family is well. I give thanks to the American people for finally coming to their senses and voting for change. And I give thanks to the Universe for us all being here.

Bean and Squash Mole from Denis Cotter's Wild Garlic, Gooseberries and Me via 101 Cookbooks

3 C butternut squash, cut in cubes
3 C cooked beans
28 oz can diced tomatoes
5-6 big kale leaves, cut in strips
3-4 Tbs butter
some olive oil
4+ jalapeno peppers, chopped
1 1/2 onions, chopped
4 cloves garlic, chopped
2-4 Tbs paprika
2 oz almonds, roasted and finely ground
3.2 oz chocolate bar, 70% cocoa


Heat oven to 350 F. Toss the squash with some olive oil and spread in a 9x13 baking pan. Bake ~20-30 minutes, unill it starts caramelizing but is still firm. In the mean time melt butter in a large pan and saute onions and jalapenos for ~15 minutes until onions star caramelizing. Add paprika and garlic and stir until fragrant. Add tomatoes. Bring to boil and let it simmer down for ~10 minutes, depending on how liquidy the tomatoes are - you do not want a dry dish! Add beans, chocolate and almonds and stir over low heat until chocolate is melted. Turn heat off, set aside and steam the kale. To assemble, pour the bean mixture in a 9x13 pan or a large casserole dish, spread the squash pieces and kale evenly over the top and stir everything lightly. This way the colors are preserved and the dish is so much more beautiful instead of turning it into a brown mush. Cover with foil and put in the oven at ~200 F until heated throughout. Serves 8 as a generous side-dish.

Notes: I used brown Tepary beans from Native Seeds and they worked wonderfully - the flavor of the beans matched well with the chocolate. The jalapenos didn't make the dish spicy, not at all, contrary to my expectations. I think I may toss a little bit of cayene pepper next time. Because there will definitely be a next time. This dish was so very delicious, people were getting second servings which means a lot when there are ~30 dishes on the table!

Bourbon Pumpkin Cheesecake via Epicurious.com

For crust:
3/4 C graham cracker crumbs (5 crackers)
1/2 C pecans, finely chopped
1/4 C packed light brown sugar
1/4 C granulated sugar
1/4 C unsalted butter

For filling:
1 1/2 C pumpkin pure
3 large eggs
1/2 C packed light brown sugar
2 Tbs heavy cream
1 tsp vanilla
1 Tbs bourbon
1/2 C granulated sugar
1 Tbs cornstarch
1 1/2 tsp cinnamon
1/2 tsp freshly grated nutmeg
1/2 tsp ground ginger
3 (8 oz) packages cream cheese, room temperature


Invert bottom of a 9-inch springform pan (to create flat bottom, which will make it easier to remove cake from pan), then lock on side and butter pan. Stir together crumbs, pecans, sugars, and butter in a bowl until combined well. Press crumb mixture evenly onto bottom and 1/2 inch up side of pan, then chill crust, 1 hour.

Heat oven to 500 F. Seriously. Whisk together pumpkin, eggs, brown sugar, cream, vanilla, and liqueur in a bowl until combined. Stir together granulated sugar, cornstarch, cinnamon, nutmeg, ginger, and salt in large bowl. Add cream cheese and beat with an electric mixer at high speed until creamy and smooth, about 3 minutes. Reduce speed to medium, then add pumpkin mixture and beat until smooth. Pour filling into crust, smoothing top. Place in oven. Bake for 8-10 minutes at 500 F. Turn the oven down to 200 F and bake for another 40 minutes. Cool cheesecake completely in pan on rack, about 3 hours. Chill, covered, until cold, at least 4 hours. Remove side of pan and bring to room temperature before serving. Serve with roasted pecans and Bourbon-caramel Sauce. Serves 12-16. Despite the startling baking instructions and my fear that I have burnt the crust beyond recognitions this cheesecake came out amazing to say the least. The sheer fact that it is already gone while we still have leftovers from everything else we cooked for Thankgiving is a testimony to how "can-i-have-one-more-piece" it was.

A spoonful of each. Sage mashed potatoes.


Cornbread muffins. The adult's table.


Waldorf salad. Yes, that kind of Thanksgiving.

Read more ...